I’m pretty sure everybody has heard of recycling before, but have you heard about upcycling? Upcycling is when you take old or discarded items to create something more useful and of better quality. It’s like recycling, but prettier.
(。◕‿◕。)
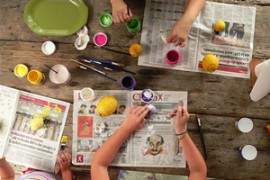
Since the school holidays are here, we’ll share with you some simple yet fun upcycling projects that you can enjoy with your little ones!
1. Lego Photo Frame
Things you will need:
- Lego bricks
- Photo frame
- Strong adhesive/glue

Lego photo frame (Photo: Samantha Okazaki / TODAY)
Turn a boring old picture frame into a bright, colourful one! This is a super easy project that kids (and some Lego-loving adults) are sure to enjoy, and will give new life to old or unused photo frames. First, arrange the Lego bricks on the photo frame to make sure all the pieces are positioned properly. Make markings or notations on the frame if needed. Next, use a strong adhesive (like the yellow tube UHU glue) and glue each of the Lego pieces in place. (Today) You can also check out Google Images for more Lego photo frame ideas!
Note: Small children will require adult supervision when handling small Lego parts and strong adhesive.

(Photo: Glued To My Crafts Blog)
2. D.I.Y. Monogram Mugs
Things you will need:
- A porcelain mug (or plastic cup for younger children)
- Oil-based paint pens
- Alphabet stickers
This is a pretty cool and fairly simple project, not only for kids but also adults. Pick an alphabet and stick it on the mug. Make sure you are satisfied with the position/angle before you proceed. Make dots all around the sticker, making sure they fill up the area around it. Use 2 or 3 different colours for variety. Peel off the sticker and do touch-ups if needed. (Glued To My Crafts)
(Optional) If you’re using a porcelain mug, pop the finished product into the oven for about 30 minutes to seal in the design.
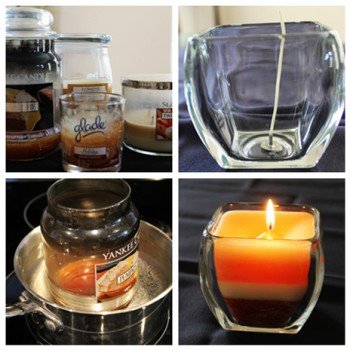
DIY upcycled layered candle (Photo: My Thirty Spot)
3. Multi-Layer Upcycled Candle
Things you will need:
- Leftover candle wax
- Glass container
- Saucepan
- Water
- Stove
- Decorative glass jar
- Candle wick
This project definitely needs some adult supervision. Gather leftover pieces of candle (remove the burnt bits, and separate them by colour. Put the candle wick inside a decorative glass jar and secure it with a few drops of wax. Put the leftover wax pieces into a glass container, and place the container inside a saucepan filled with hot water in order to melt the wax. Once melted, pour the wax into the decorative glass jar. Allow the layer to harden before repeating the process with different coloured wax until you have a beautiful multi-layered candle. (My Thirty Spot)
(Alternative) If your wax pieces are all a single colour, you can melt them in batches and add different coloured dyes and/or scented oils.

(Photo: CubeSmart)
4. Soup Can Pencil Organizer
Things you will need:
- 3 or 6 tin cans (e.g. mushroom soup cans)
- Strong adhesive/glue
- Pretty wrapping paper
Children love cream of mushroom soup, and you’ll definitely have a few cans lying around. Instead of taking them to the recycling center, why not make a useful stationery organizer out of them? You will need to sand or smoothen any sharp jagged edges of the soup can before starting. Measure, cut out and paste pieces of colourful wrapping paper to wrap around the cans. Then stack them into a triangle shape (like in the picture above) and use strong adhesive to glue them in place. You can use them both horizontally on the desk like regular pencil containers, or leave them standing vertically and place them against a wall for an extra special look. (CubeSmart)
(Optional) You can decorate the cans with lots of other things like stickers, sequins, ribbons, lace, etc!

(Photo: CubeSmart)
5. Cereal Box Paper Organizer
Things you will need:
- A few empty cereal boxes
- Scissors
- Glue
- Wrapping or construction paper
Make a quirky and environmentally friendly paper organizer using 2 or 3 cereal boxes stacked on top of each other! First, cut out the flaps at the top of each box. Wrap the edges of the top with coloured paper or tape to seal the edges. Stack and glue the boxes on top of each other, wrap the glued-together boxes with some beautiful coloured paper, and you’re done! Just like the pencil organizer, you can decorate your paper organizer with stickers, ribbons, and anything else you can think of. (CubeSmart)